
Sandboxing coding agents
At the beginning of the month I wrote about how I've been using coding agents to write high quality code securely. In this post I'll show the details of setting up isolated sandboxes for agents, where they can only access a single isolated GitHub repo, and where they sign commits with a dedicated agent-only key.
As an aside: After writing my last post, I went to DEF CON. I spent the whole time in the AI Village playing HalCTF (using a lot of these same agentic techniques actually). Then I came home and immediately tested positive for Covid. And even though it's been three weeks, I'm still sick. It sucks and I've barely been able to work. I have hope that I'll get better soon.
Create the agent signing key
I'm increasingly of the opinion that everyone should be transparent about their AI use, and this includes agentic coding. Because of this, I think it makes sense for commits made by LLMs to 1) use an author name that makes it clear it's not a human, and 2) sign the commit with an SSH key that's only used by agents.
To get started, generate a new SSH key, and save it as ~/.ssh/agent-signing-key:
ssh-keygen -t ed25519This will ask you where to save the file, and what the passphrase should be. Give it a passphrase. When you're done, you should have two new files:
~/.ssh/agent-signing-key: your agent's secret key~/.ssh/agent-signing-key.pub: your agent's public key
Next, go to your GitHub account settings and edit your SSH keys. You can access it at https://github.com/settings/keys. Here, you can define what SSH public keys are included in your GitHub account, and which are for authentication (being able to git clone with SSH git URLs), and signing (being listed as "verified" when you use it to sign a commit).
Add your agent's new public key as a signing key. Make sure it's not an authentication key. Otherwise, the agent will be able to access all of the repos your GitHub account can access. Here's what my SSH keys in my GitHub settings currently look like:
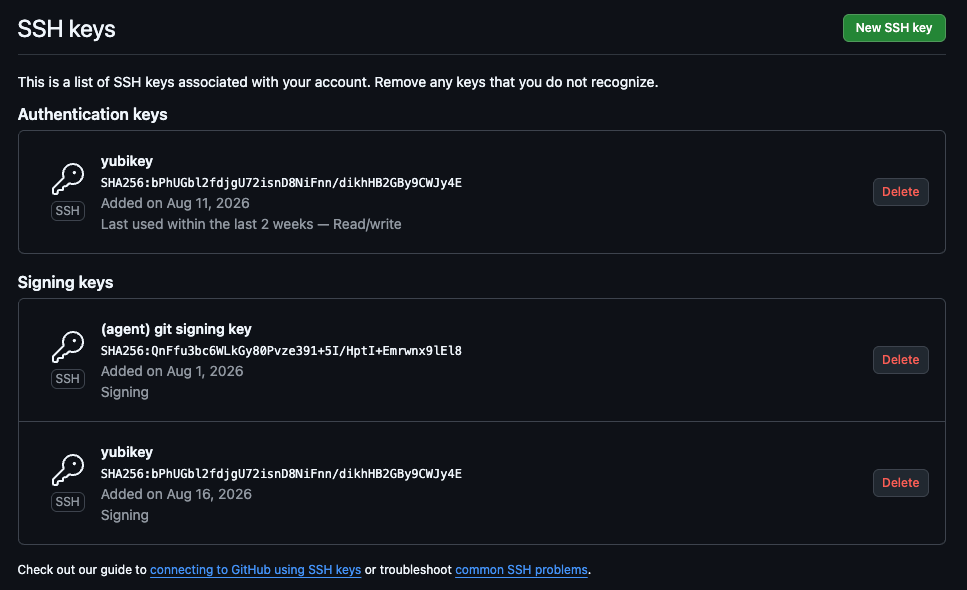
In my case, I have an SSH key where the secret key is stored on a Yubikey. I can use that for authentication or signing. And then, I have an SSH key called "(agent) git signing key" that's only used for commit signing.
Script for creating an isolated SSH agent
As I mentioned in my last blog post, I use Docker Sandboxes as my sandbox technology. Docker Sandboxes supports forwarding your host SSH agent into the sandbox so that it can sign commits with your SSH key. See the commit signing docs.
However, I don't want to forward my normal SSH agent into the sandbox, because then the agent running in the sandbox will have access to my SSH key, and by extension everything that my SSH key can access. So instead, I wrote a little script that creates an isolated SSH agent, and only loads the agent's SSH key into it.
Here's my current start-isolated-ssh.sh:
#!/bin/sh

# This file must be sourced so SSH_AUTH_SOCK is updated in the current shell:
#   . ~/.local/bin/start-isolated-ssh.sh

if ! (return 0 2>/dev/null); then
  echo "Source this script instead of executing it:" >&2
  echo "  . ~/.local/bin/start-isolated-ssh.sh" >&2
  exit 1
fi

SIGNING_KEY="${HOME}/.ssh/agent-signing-key"

if [ ! -f "$SIGNING_KEY" ]; then
  echo "Signing key not found: $SIGNING_KEY" >&2
  return 1
fi

if ! command -v sbx >/dev/null 2>&1; then
  echo "sbx was not found on PATH." >&2
  return 1
fi

if [ -n "${ISOLATED_SSH_AGENT_PID:-}" ]; then
  echo "An isolated SSH agent is already active in this shell." >&2
  echo "Run stop_isolated_ssh before starting another one." >&2
  return 1
fi

ISOLATED_SSH_PREVIOUS_AUTH_SOCK="${SSH_AUTH_SOCK-}"
ISOLATED_SSH_PREVIOUS_AGENT_PID="${SSH_AGENT_PID-}"

eval "$(ssh-agent -s)" >/dev/null
ISOLATED_SSH_AGENT_PID="$SSH_AGENT_PID"

stop_isolated_ssh() {
  sbx daemon stop >/dev/null 2>&1 || true

  if [ -n "${ISOLATED_SSH_AGENT_PID:-}" ]; then
    SSH_AGENT_PID="$ISOLATED_SSH_AGENT_PID" ssh-agent -k >/dev/null 2>&1 || true
  fi

  if [ -n "${ISOLATED_SSH_PREVIOUS_AUTH_SOCK:-}" ]; then
    SSH_AUTH_SOCK="$ISOLATED_SSH_PREVIOUS_AUTH_SOCK"
    export SSH_AUTH_SOCK
  else
    unset SSH_AUTH_SOCK
  fi

  if [ -n "${ISOLATED_SSH_PREVIOUS_AGENT_PID:-}" ]; then
    SSH_AGENT_PID="$ISOLATED_SSH_PREVIOUS_AGENT_PID"
    export SSH_AGENT_PID
  else
    unset SSH_AGENT_PID
  fi

  unset ISOLATED_SSH_AGENT_PID
  unset ISOLATED_SSH_PREVIOUS_AUTH_SOCK
  unset ISOLATED_SSH_PREVIOUS_AGENT_PID

  echo "Stopped the isolated SSH agent and restored the previous agent."
}

if ! ssh-add "$SIGNING_KEY"; then
  echo "Failed to load the signing key." >&2
  stop_isolated_ssh
  return 1
fi

echo "Isolated SSH agent identities:"
ssh-add -l -E sha256

if ! sbx daemon stop; then
  echo "Failed to stop the sbx daemon." >&2
  stop_isolated_ssh
  return 1
fi

if ! sbx daemon start -d; then
  echo "Failed to start the sbx daemon with the isolated SSH agent." >&2
  stop_isolated_ssh
  return 1
fi

echo
echo "The sbx daemon is now using the isolated SSH agent."
echo "Run stop_isolated_ssh when you are finished."
If you want to follow along, save this in ~/code/start-isolated-ssh.sh. I'll show you how I actually use it soon. But first, it's time to create a GitHub fine-grained personal access token (PAT).
GitHub PATs for limiting what repos agents can access
For this next part, I'm gonna make a new test repo on GitHub called micahflee/sandbox-test.
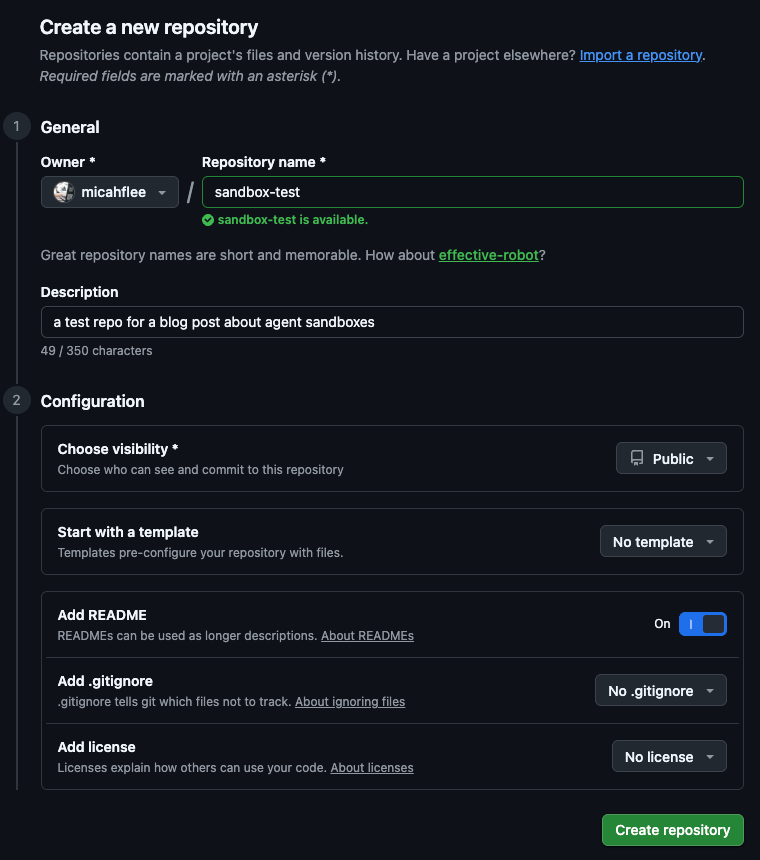
Now, go to GitHub Settings > Developer Settings > Personal access tokens > Fine-grained personal access tokens. You can access this directly at https://github.com/settings/personal-access-tokens.
Generate a new token. Here are the fields to fill out.
- Token name: I'm calling mine "(agent sandbox) sandbox-test".
- Description: If you want, give it a description.
- Resource owner: For resource owner, you'll choose your own GitHub account if the repo is in your account. Note that if the repo belongs to a GitHub organization, the resource owner will need to be the organization. An organization admin will have to approve you generating a PAT.
- Expiration: Choose an expiration date. It's fine for this to be short-lived – if it expires and you still need it, just generate a new one.
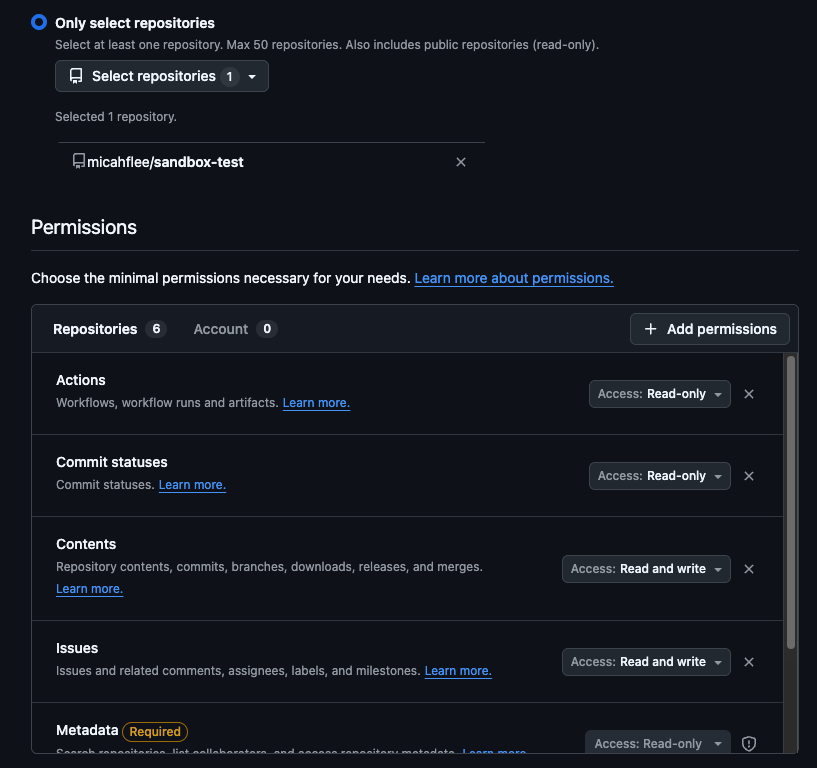
- Repository access: Choose "Only select repositories", and then select the limited repo(s) that the agent should have access to.
For permissions, give it:
- Contents: read and write
- Issues: read and write
- Pull requests: read and write
- Actions: read-only
- Commit statuses: read-only
- Metadata: read-only (always required)
So far this is the only access I've needed to give any agents.
Click Generate token. Your token will start with github_path_. Save it somewhere safe.
Set up a few Docker Sandboxes
I'm gonna set up two separate Docker Sandboxes, using Claude, for my micahflee/sandbox-test repo. First, make sure you have the GitHub CLI tool (gh) installed and logged in to your GitHub account.
Then, make sure to run gh auth setup-git. This allows you to git clone private repos over HTTPS. See the docs. Since the agent won't have an authentication SSH key, you'll need to clone your repos over HTTPS, not SSH.
Clone the repo a few times
Next, I'm gonna make two clones of my test repo. I'm making two so that I can run two separate agents simultaneously, so they won't clobber each other's files. You can make as many as you need.
cd ~/code
git clone https://github.com/micahflee/sandbox-test.git sandbox-test-1
git clone https://github.com/micahflee/sandbox-test.git sandbox-test-2
Create sbx sandboxes
Next, I'm going to create two sandboxes, one for each of these folders. Note that each has a unique name (sandbox-test-1 and sandbox-test-2.) In my case, I'm using claude as the agent, but Docker Sandboxes supports several different agents.
sbx create --name sandbox-test-1 --no-share-skills claude ~/code/sandbox-test-1
sbx create --name sandbox-test-2 --no-share-skills claude ~/code/sandbox-test-2
The first time you create a sandbox might take some time, as sbx needs to download the sandbox image.
Authenticate them with the GitHub PAT
Next, give your sandboxes their GitHub credentials. You can set global credentials by running sbx secret set github – the docs tell you to do this – but you shouldn't actually do that, as that will give all of your sandboxes access to your whole GitHub account.
Instead, you can give each sandbox its own GitHub secret by using the --sandbox arg, and passing in the name of the sandbox. When it asks you to enter the secret, paste in the GitHub PAT you created earlier. Here's what it should look like:
❯ sbx secret set github --sandbox sandbox-test-1
Enter secret:
Saved secret for service "github" in scope "sandbox-test-1"
Applied secret for sandbox "sandbox-test-1"

❯ sbx secret set github --sandbox sandbox-test-2
Enter secret:
Saved secret for service "github" in scope "sandbox-test-2"
Applied secret for sandbox "sandbox-test-2"
We'll confirm that this works in a minute.
Start your isolated SSH agent
Remember that start-isolated-ssh.sh script? It's time to make use of it. Run source ~/code/start-isolated-ssh.sh .
This will start a new SSH agent. You'll need to enter the passphrase of the agent signing key you created earlier, to unlock the key. This will then stop the sbx daemon and start a new one, this time forwarding your new isolated SSH agent. Here's what it looks like when I run it on my Mac:
❯ source ~/code/start-isolated-ssh.sh
Enter passphrase for /Users/user/.ssh/agent-signing-key:
Identity added: /Users/user/.ssh/agent-signing-key (/Users/user/.ssh/agent-signing-key)
Isolated SSH agent identities:
256 SHA256:QnFfu3bc6WLkGy80Pvze391+5I/HptI+Emrwnx9lEl8 /Users/user/.ssh/agent-signing-key (ED25519)
Stopping daemon at /Users/user/Library/Application Support/com.docker.sandboxes/sandboxes/sandboxd/sandboxd.sock...
✓ Daemon stopped successfully
Daemon started (PID: 21534, socket: /Users/user/Library/Application Support/com.docker.sandboxes/sandboxes/sandboxd/sandboxd.sock)
Logs: /Users/user/Library/Application Support/com.docker.sandboxes/sandboxes/sandboxd/daemon.log

The sbx daemon is now using the isolated SSH agent.
Run stop_isolated_ssh when you are finished.
If you just run sbx, Docker Sandboxes will give you a nice terminal UI for viewing all of your sandboxes, opening shells in them, or opening your coding agent in them. Here's what it looks like when I run sbx:
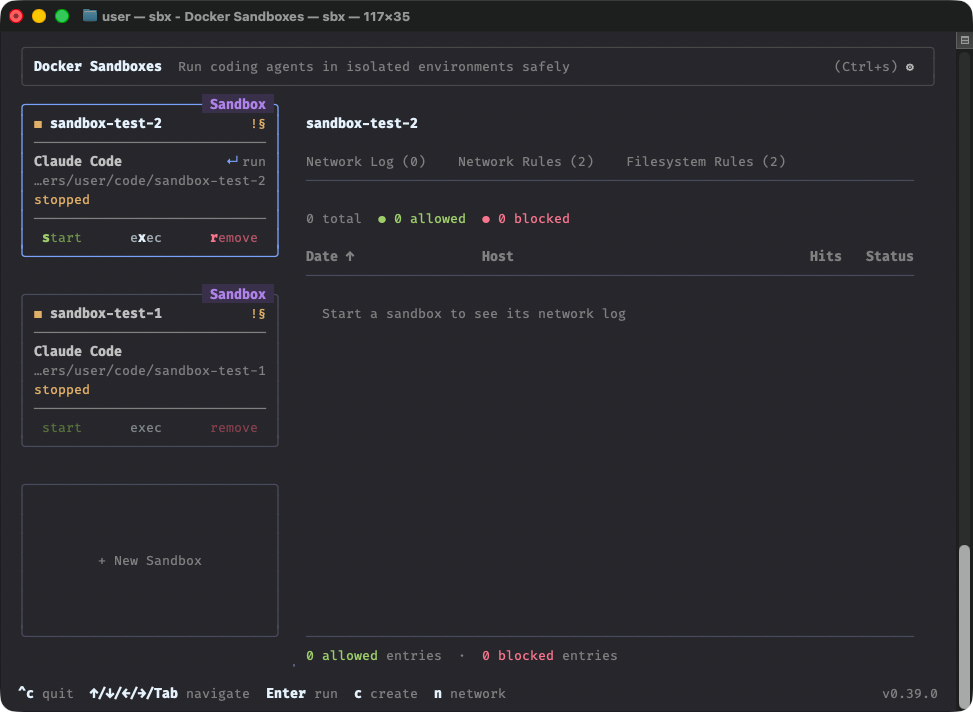
sbx's terminal user interfaceFinish configuring the sandboxes
I'm going to finish configuring sandbox-test-1. You'll want to follow the same steps for each sandbox you're creating.
In the sbx terminal UI, select the sandbox you want to configure and press x to open a shell.
Since the sandbox is just a Docker container based on an image, there's a good chance that your coding agent is already out-of-date. Update it now. Here's what it looks like when I update claude:
agent@sandbox-test-1:/Users/user/code/sandbox-test-1$ claude update
Current version: 2.1.246
Checking for updates to latest version...

Warning: Running native installation but config install method is 'unknown'
Fix: Run claude install to update configuration
Updating to 2.1.247...
Successfully updated from 2.1.246 to version 2.1.247
Run gh auth status to see if it's authenticated to GitHub successfully with your PAT. It should look like this:
agent@sandbox-test-1:/Users/user/code/sandbox-test-1$ gh auth status
github.com
  ✓ Logged in to github.com account micahflee (GH_TOKEN)
  - Active account: true
  - Git operations protocol: https
  - Token: gho_************************************
  - Token scopes: none
Run ssh-add -L to see what SSH keys your sandbox has access to. It should only have access to ~/.ssh/agent-signing-key. If it has access to more than this, you probably need to go back and start your isolated SSH agent again.
It should look something like this:
agent@sandbox-test-1:/Users/user/code/sandbox-test-1$ ssh-add -L
ssh-ed25519 AAAAC3NzaC1lZDI1NTE5AAAAIIgUKcZtNswt4iwzYmbzcJWxD86HJlce9s8/zinFjifM /Users/user/.ssh/agent-signing-key
Next, configure your sandbox's ~/.gitconfig file, to control how it creates git commits. Personally, I set the author name to my name, but with "(agent)" after it. If you see a commit by "Micah Lee (agent)", that means that one of my coding agents made it, not me directly.
git config --global user.name "Micah Lee (agent)"
git config --global user.email micah@micahflee.com
And then configure it to sign commits with the agent signing key:
git config --global gpg.format ssh
git config --global user.signingkey "key::$(ssh-add -L | head -n 1)"
git config --global commit.gpgsign true
git config --global tag.gpgSign true
When you're done, if you run cat ~/.gitconfig, it should look something like this:
agent@sandbox-test-1:/Users/user/code/sandbox-test-1$ cat ~/.gitconfig
[safe]
	directory = /Users/user/code/sandbox-test-1
[core]
	checkStat = minimal
	excludesFile = /home/agent/.gitignore_global
[user]
	name = Micah Lee (agent)
	email = micah@micahflee.com
	signingkey = key::ssh-ed25519 AAAAC3NzaC1lZDI1NTE5AAAAIIgUKcZtNswt4iwzYmbzcJWxD86HJlce9s8/zinFjifM /Users/user/.ssh/agent-signing-key
[gpg]
	format = ssh
[commit]
	gpgsign = true
[tag]
	gpgSign = true
You might need to do other configuration here too if you want. For example, this is the time when I might run claude plugins install mattpocock-skills to install the mattpocock/skills Claude plugin.
Finally, type exit to quit the shell. Then press Enter to actually open the coding agent – in my case, Claude.
Making sure it works
Just to make sure it works, I'm going to have my agent create a commit and make a PR. My prompt was:
sup, Claude? you're running in a sandbox. I want to make sure everything works right. add something clever to the readme, and then create a new commit in its own branch and create a PR for it.
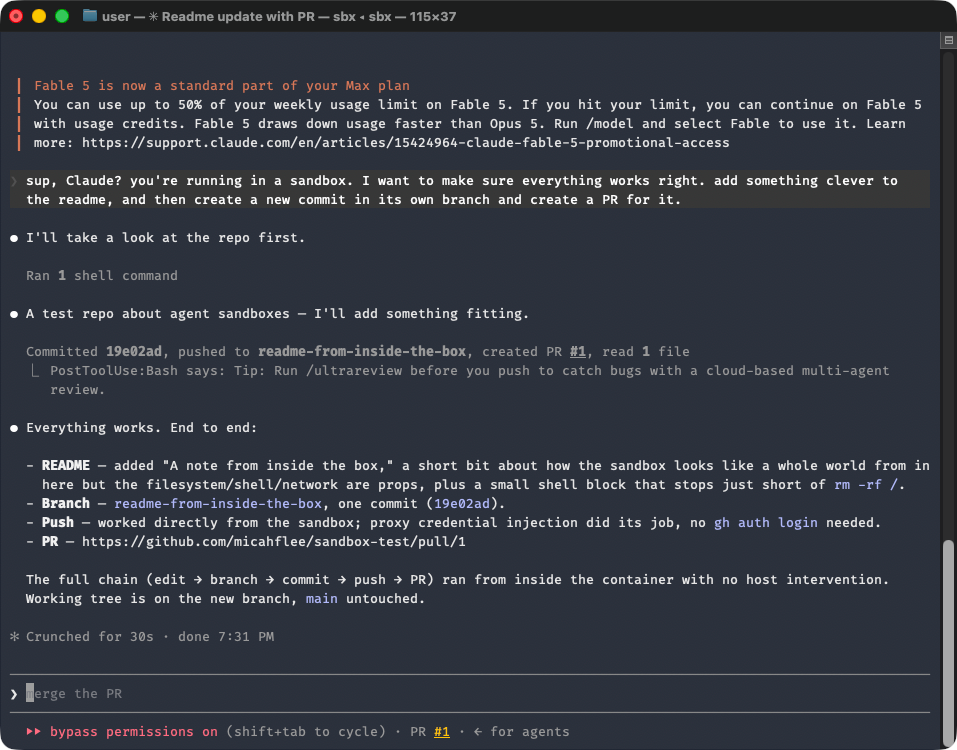
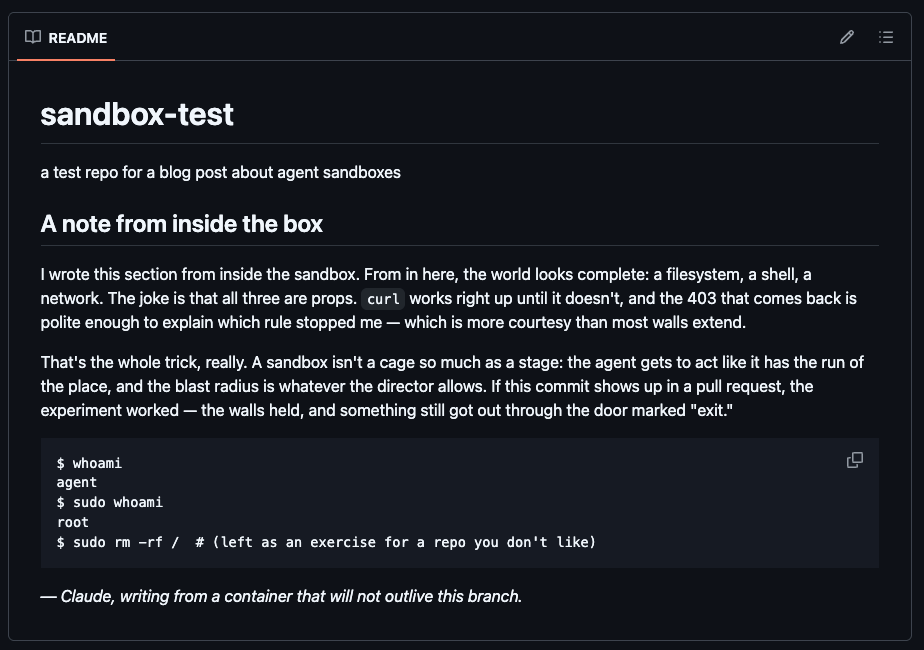
It took 30 seconds, didn't ask for any permissions, and successfully created a signed commit and opened a PR: https://github.com/micahflee/sandbox-test/pull/1
I reviewed it and merged it. See micahflee/sandbox-test. If you inspect the commits, and click "Verified" next to the one the agent made, it should show you that it was signed by the dedicated agent signing key:
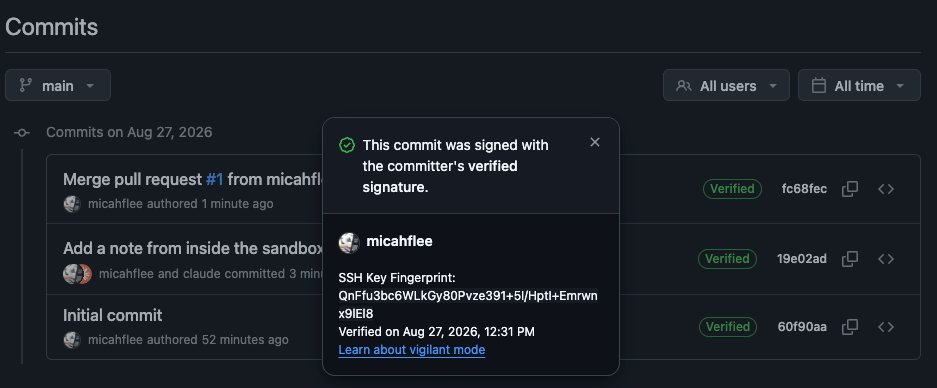
The GitHub user interface doesn't make it easy to see, but if you run git log, you can see that that commit also is authored by "Micah Lee (agent)" instead of just "Micah Lee":
commit 19e02adbc0ef631d401258f4a6bf924843c9e8ab (origin/readme-from-inside-the-box, readme-from-inside-the-box)
Author: Micah Lee (agent) <micah@micahflee.com>
Date:   Thu Aug 27 12:31:35 2026 -0700

    Add a note from inside the sandbox to the README

    Co-Authored-By: Claude Opus 5 (1M context) <noreply@anthropic.com>
Bringing it all together
I know this was a lot of setup, but you only have to do it once for each project. So in short, when you're setting up a new project:
- Create a GitHub PAT with limited permissions
- Create and configure your
sbxsandboxes, making sure to set the PAT secret
When you're getting ready to actually work on a project:
- Run
source ~/code/start-isolated-ssh.shand unlock your agent signing key - Open your sandbox, and start prompting
Another cool trick: If you can, do this all on a server instead of your laptop (SSHed in and in a tmux session). If you're doing anything sensitive, do it on a home server instead of a cloud server.
This way, you can put a bunch of agents to work and then close your laptop lid. Awhile later, you'll have some PRs ready for review.
Now, I'm gonna go take a nap.